Showing posts with label cake. Show all posts

26 December 2010

On the Twelfth Day of Christmas, My True Love Gave to Me...

As you can see, I've been cracking open Dorie Greenspan's Baking from My Home to Yours more frequently as of late; and instead of just sighing at the beautiful pictures, I've been more motivated to try recipes out.


For Christmas dessert, I made this Brownie Cake with a caramel topping. The cake was really a no-brainer and it ended up tasting just like a brownie leaning more toward the cake-end of the brownie spectrum. The caramel was exciting for me; I've only made caramel once or twice before and each time I forget how to do it.


More notably, I forget how boring it is to sit there and wait and wait and wait and wait and wait for the caramel to change colors slightly while worrying that you'll miss it and that it will burn and everything will be ruined forever. That may be an exaggeration, but that's how I felt watching the caramel for seven minutes without blinking once. In the end, the waiting paid off and the caramel was salty and sweet and the brownie cake paired with it perfectly.


Caramel-Peanut-Topped Brownie Cake
Makes about 12 servings

1 cup all-purpose flour
1 teaspoon baking soda
1/4 teaspoon salt
8 tablespoon butter, cut into 8 pieces
5 ounces bittersweet chocolate, coarsely chopped
3 large eggs
1/2 cup packed light brown sugar
1/4 cup sugar
3 tablespoon light corn syrup
1/2 teaspoon vanilla extract

2 cups sugar
1/2 cup water
1 1/2 tablespoons light corn syrup
2/3 cups heavy cream
2 tablespoon unsalted butter, at room temperature
1 cup salted peanuts

Center a rack in the oven and preheat the oven to 350F. Butter an 8-inch spring-form pan, dust the insides with flour, tap out the excess, line the bottom of the pan with a parchment paper. Place the springform pan on a baking sheet.

To make the cake, combine the flour, salt and baking soda in a small bowl. Whisk together to mix and set aside. Add the butter and chocolate to a heatproof bowl and set over simmering water. Heat, stirring occasionally, until the ingredients are melted - do not let them get so hot that the butter separates. Remove the bowl from heat and set aside.

In a large mixing bowl, whisk together the eggs and sugars till well-blended. Whisk in the corn syrup, followed by the vanilla. Add in the melted butter and chocolate mixture, and whisk till combined. Gently whisk in the dry ingredients, mixing only until they are incorporated. The batter should be thick, smooth and shiny. Pour it into the prepared pan and jiggle the pan a little to even out the batter.

Bake for 40-45 minutes or until a thin knife inserted in the middle comes out almost clean. Transfer rack to a pan to cool for 15 minutes, then run a knife gently between the pan and the cake and carefully remove the sides of the springform pan. The cake may have puffed up during baking, but don't be concerned if it develops a crater in the center while cooling. Allow to cool to room temperature. When the cake is completely cool, invert it, remove the base and peel off the parchment paper. Wash and dry the pan, place the cake back into the clean pan, right side up, and fasten sides.

To make the topping: combine the sugar, water and corn syrup in a heavy, medium-sized pan, stirring just to combine the ingredients. Place the pan over medium high heat. Heat, without stirring, till the caramel turns amber (5-10 minutes). As the sugar is caramelizing, wipe down any splatters on the sides of the pan with a pastry brush dipped in cold water. To test the color of the caramel, drop a bit onto a white plate. Don't be timid about the color - if it's too pale, it won't have much flavor.

Lower the heat a bit, stand back and add the cream and butter. When the sputters are less vehement, stir to calm down the caramel and dissolve any lumps. Stir in the peanuts and pour the mixture into a 1-quart Pyrex measuring cup or other heat-proof bowl.

You will have more caramel than you need, but you want to get all the peanuts onto the cake, so spoon out all the peanuts out of the hot caramel and onto the cake. Pour or spoon over enough caramel to cover all the nuts, drizzling a little over the edges of the cake for presentation. Allow the topping to set at room temperature, about 20 minutes, before serving. Keep the leftover caramel at room temperature and save for another use.

03 November 2010

The Cake that I Lit on Fire

Dorie Greenspan tells a really great story about this cake in her book, Baking from My Home to Yours. I can't top it. She calls it "The Cake that Got Me Fired."


I didn't have any armagnac, so I ended up using brandy. I also didn't have prunes, so I just took those out. This means that I just lit the brandy on fire in a pan - which was easily the most exciting part of making this cake. The cake in itself was really spectacular - moist, dense, and chewy with the heavenly ganache topping it off just right. I preferred it refrigerated, so that the chocolate was even denser and seemed to melt in my mouth.


Chocolate Armagnac Cake (Modified for Wussies)
Makes about 12 servings

2/3 cup finely ground pecans (or walnuts)
1/4 cup all-purpose flour
1/4 teaspoon salt
3 tablespoons water
1/4 cup Armagnac (or cognac, brandy or Scotch whisky)
7 ounces bittersweet chocolate, coarsely chopped
1/2 cup unsalted butter, cut into 4 pieces
3 large eggs, separated
2/3 cup sugar

3 ounces bittersweet chocolate, coarsely chopped
3 tablespoons confectioners’ sugar
3 tablespoons unsalted butter, at room temperature

Center a rack in the oven and preheat the oven to 375 degrees. Butter an 8-inch springform pan, fit the bottom of the pan with a round of parchment or wax paper and butter the paper. Dust the inside of the pan with flour and tap out the excess. Put the pan on a baking sheet lined with parchment or a silicone mat.

Whisk together the nuts, flour and salt. Preheat a pan on the stovetop for three minutes; remove the pan and pour in the Armagnac. Stand back and set it aflame.

Combine the chocolate, butter and water in a heatproof bowl, set it over a pan of simmering water and stir occasionally until the chocolate and butter are melted; or do this in a microwave oven. Remove the chocolate from the heat just as soon as it is melted and not very hot—you don’t want the chocolate and butter to separate.

In a large bowl, whisk the egg yolks and sugar together until thick and pale, about 2 minutes. Switch to a rubber spatula and, one by one, stir in the chocolate and butter mixture as well as the nut mixture.

Working with a stand mixer fitted with the whisk attachment or with a hand mixer in a large bowl, beat the egg whites until they hold firm, glossy peaks. Stir about one quarter of the beaten whites into the chocolate mixture, and then gently fold in the remaining whites. Turn the batter into the pan.

Bake the cake for 28 to 32 minutes, or until it is puffed, firm on top and starting to come ever so slightly away from the sides of the pan; a thin knife inserted into the center will come out streaky—the cake should not be wet, but you don’t want it to be completely dry. Transfer the cake to a rack and let it cool for about 10 minutes, then carefully remove the sides of the pan. Invert the cake, pull off the paper and turn right side up to cool to room temperature. The cake should be absolutely cool before you glaze it.

If the cake has crowned, use a long serrated knife and a gentle sawing motion to even the top. Turn the cake over onto a cooling rack—you want the very flat bottom of the cake to be the top. Put a piece of wax paper or foil under the cooling rack to serve as a drip catcher.

To make the glaze, melt the chocolate in a heatproof bowl over a pan of gently simmering water, or in a microwave oven. Remove it from the heat and, using a small spatula, stir in the sugar, then the butter, a bit at a time, stirring until you have a smooth glaze.

Have a long metal icing spatula at hand. Pour the glaze over the top of the cake, allowing the excess to rundown the sides, and use the spatula to smooth the top of the cake if necessary—usually the glaze is a self-spreader—and to even it around the sides of the cake. Let the glaze set at room temperature or, if you want to speed it up, slide the cake into the refrigerator for about 20 minutes. If you’d like the glaze to be more like a frosting, let it cool until it is thick enough to spread, then swirl it over the cake.

The cake can be served at room temperature or chilled; it is more flavorful at room temperature but intensely fudgy when chilled.

15 October 2010

Livin' in the South

I took a Food and Wine Pairing class online where we had to take a traditional Southern recipe and update it. I guess I'm boring (or lazy) (or both) because I just went ahead and picked a pound cake. I also think of pound cake as being one of the most basic cakes.


I went through countless traditional recipes of pound cake, each asking for "a pound" of each ingredient. I updated the recipe, measurement-wise, and added a pecan element as a callback to the Southern requirement of the assignment. I also added a maple drizzle. Don't ask me. I don't know why.


This wasn't my favorite thing. But it's a pretty basic pound cake, when it comes down to it. If you're a big pound cake fan, then you should try this. Otherwise, maybe just look at the pretty pictures and feel satisfied in that.

Butter Pecan Pound Cake with Maple Drizzle
Makes about 12 servings

1 cup butter
1/2 cup shortening
3 cups granulated sugar
5 eggs
1 teaspoon rum (optional)
1 teaspoon vanilla extract
3 cups flour
1 teaspoon baking powder
1 cup milk
1 cup chopped pecans, plus 1/3 cup whole pecans
1/2 cup powdered sugar
3 tablespoons maple syrup

Preheat oven to 325 degrees. Grease and flour a Bundt pan.

Using paddle attachment on a standing mixer with a stationary bowl, cream together butter, shortening, and sugar until very fluffy, about seven or eight minutes. Add eggs, one at a time, beating until well-combined.

In a small bowl, combine rum and vanilla extract with milk. In another bowl, whisk together baking powder and flour. Alternately add liquid and dry ingredients to the butter mixture, starting and ending with liquid.

Stir in walnuts. Pour batter into prepared Bundt pan. Bake for about 70 minutes until cake tests done. In a small bowl, whisk together powdered sugar and maple syrup. Drizzle over the cake after it cools for twenty minutes. Sprinkle whole pecans over cake.

24 July 2010

Strawberries and Such

On the search for my Dream Cake, I frequently encountered recipes for strawberry cream cakes and strawberry shortcakes. Martha, as usual, made the most compelling bid, and I decided I should make it during the dog days of summer.


I know what you're thinking. Do I ever get tired of strawberries? The answer is, when it's 100 degrees outside, no. I never get tired of strawberries. On top of this, freshly whipped cream is one of my favorite things in the world. This slightly-sweet cake paired with the cold cream and the fresh strawberries make me think of...well, a relaxing treat on a hot summer's day.


Strawberry Cream Cake
Makes about 10 servings

1/2 cup (1 stick) unsalted butter, room temperature, plus more for pan
1 1/2 cups all-purpose flour (spooned and leveled), plus more for pan
2 teaspoons baking powder
1/2 teaspoon salt
1 cup sugar
2 large eggs plus 2 large egg yolks
1/2 teaspoon pure vanilla extract
1/2 cup whole milk
1 pound strawberries, hulled and thinly sliced
1 teaspoon unflavored gelatin (from a 1/4-ounce envelope)
1 1/2 cups heavy cream

Preheat oven to 350 degrees. Butter bottom of an 8-inch round cake pan, and line with parchment paper. Butter and flour paper and sides. In a medium bowl, whisk together flour, baking powder, and salt; set aside.

Using an electric mixer on high speed, beat butter and 1/2 cup sugar in a large bowl until light and fluffy. Add eggs and yolks, one at a time, beating well after each addition. Beat in vanilla. With mixer on low, alternately add flour mixture in 3 parts and milk in 2, beginning and ending with flour mixture; mix just until combined. Spread batter in prepared pan.

Bake until a toothpick inserted in center of cake comes out clean, 30 to 35 minutes. Cool in pan 10 minutes; invert onto a wire rack to cool completely. Using a serrated knife, split cake in half horizontally; place bottom half, cut side up, on a serving plate.

Make topping: In a large bowl, combine strawberries and 1/4 cup sugar; set aside. Place 2 tablespoons cold water in a small saucepan, and sprinkle with gelatin; let soften 5 minutes. Place saucepan over very low heat, and stir until gelatin is dissolved. Remove from heat; let cool.

Using an electric mixer, beat cream and remaining 1/4 cup sugar in a large bowl until very soft peaks form. Continue to beat, and gradually add gelatin mixture; beat until soft peaks form.

Arrange half of strawberries over bottom cake layer; top with half of whipped cream, leaving a 1-inch border. Cover with top half of cake, cut side down. Top cake with remaining whipped cream, leaving a 1-inch border. Refrigerate cake and remaining strawberries separately, at least 1 hour (or up to 1 day). Just before serving, spoon strawberries over cake.

23 June 2010

My Dream Cake

Sometime around the age of 16, I stumbled across this picture:


Since then, I have spent every birthday trying to recreate a cake that I only have photographic evidence of. After I did more research into my dream cake, I realized that it was actually an ice cream cake. I chose to ignore this and thought of it as a fluffy white cake with thick, creamy buttercream frosting, and a sweet strawberry filling. Until this year, I never really knew what it would taste like.

Until...


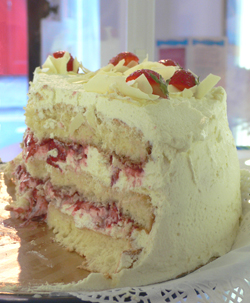
I'm going to go ahead and be honest here: this is the best cake I have ever made. Not only is it the prettiest, it tasted exactly the way the original picture looked. There was just the right amount of frosting, cake, strawberries, heaven, etc. It was moist, creamy, and tangy. It was my dream cake. And it came from this Frankenstein of a recipe.


Fluffy White Cake White Chocolate Frosting and Strawberry Filling
Also known as My Dream Cake
Makes about 12 servings

18 tablespoons (2 sticks plus 2 tablespoons) unsalted butter, room temperature, plus more for pans
4 1/2 cups cake flour (not self-rising) plus more for pans
1 1/2 cups whole milk
9 large egg whites, lightly beaten
1 tablespoon pure vanilla extract
1/2 teaspoon almond extract
2 tablespoons baking powder
1 1/2 teaspoons salt
2 1/4 cups sugar

9 ounces white chocolate, finely chopped
3 1/2 cups confectioners' sugar
1/2 cup milk
1 teaspoon vanilla extract
12 tablespoons (1 1/2 sticks/6 oz.) unsalted butter, softened
1/2 teaspoon salt

1 small carton strawberries, separated
Sugar, to taste

Preheat oven to 350 degrees. Butter and flour two 9-inch round cake pans, tapping out excess flour; set aside.

In a medium bowl, stir together, milk, egg whites, and extracts. Into a second medium bowl, sift together the flour, baking powder, and salt; set aside. In the bowl of an electric mixer fitted with the paddle attachment, beat the butter on medium speed for 30 seconds. With machine running, gradually add the sugar. Continue beating until light and fluffy, about 2 minutes. Scrape down sides of bowl as necessary.
Add one-third of the flour mixture and one-third of the milk mixture, and beat on low speed until just incorporated. Add remaining flour and milk mixtures in 2 separate batches beating between additions to fully incorporate. Scrape down sides of bowl, and stir by hand to finish.

Divide batter evenly between prepared pans. Smooth surface with a rubber spatula. Bake until top of cake springs back when lightly pressed and a cake tester inserted in the center comes out clean, 25 to 30 minutes. Let cakes cool in pans on wire racks for 5 minutes. Run a small metal spatula around the sides of the pan, and invert cakes onto greased racks. Reinvert cakes onto cooling rack. Let cool completely before filling.

To make the frosting, melt the white chocolate in a double boiler. Stir until smooth. Let cool to room temperature. Sift the confectioners' sugar into a medium bowl. Stir in the milk and vanilla. Add the butter and salt and beat until smooth. Stir in the cooled white chocolate. Refrigerate until firm enough to frost the cake, about 30 minutes.

To make the filling, mash up about ¾ of the carton of strawberries. Add in sugar, just a little at a time, until desired sweetness is reached. To assemble the cake, take one layer and cover with a thin layer of frosting and then cover with strawberry filling. Take the other layer and frost one side with a thin layer of frosting; lay this second layer, frosting side down, onto the first layer (so the order is cake-frosting-filling-frosting-cake). Frost the top and sides of the cake. Cut the remaining strawberries into decorative shapes and place on top and sides of cake. Top with white chocolate shavings.

24 June 2009

Something Witty About Birthdays Here

I decided to go out on a kind of limb for my birthday cake, and I found a recipe in my mom’s cookbook/binder. I picked one of those inserts that all moms inevitably have in their recipe collections. This specific one, a cheesecake with a chocolate swirl, is from the Great American Home Baking collection. This was my first time making cheesecake, and I have to admit that I didn’t quite realize that it was baked.

Naked cheesecake; the frosting allowed for cracks in the actual cheesecae


My birthday chocolate cheesecake was, at first taste, a real let-down. Even though I blended the cream cheese at room temperature for at least fifteen minutes, I could not get the small lumps out. For whatever reason, the three packets of cream cheese I had purchased had decided to just bead up. This really took away from the overall attractiveness of the cake for me; when you sliced it, you could see a cross-section of cream cheese blobs, instead of a delightfully smooth and flawless surface.

Witch candles


The really surprising part of this cake was the frosting. I had never heard of a cheesecake with frosting and my mom was skeptical, but it ended up not being too sweet, and it had a delicious tangy flavor, thanks to the sour cream.

The single and alluring slice, candles in


Although the cake never smoothed out, the flavor kept getting better, which is actually an excellent thing to hope for with birthday cake. I only let my mom take a small portion to work, so that I could actually get to eat some of my own cake this year, and I ended up eating about half of it by the end of a week and a half. Which means: my birthday cheesecake was victorious! If I can ever find out what I did wrong with the cream cheese, I will definitely make it again.

Nothing says happy birthday like forcing yourself to smile for a picture


Chocolate Cheesecake
Makes one 9-inch cheesecake

2 cups chocolate wafer crumbs
5 tablespoons melted butter

3 (8-ounce) packages cream cheese, room temperature
1 cup granulated sugar
5 large eggs
2 ounces semisweet chocolate, melted

6 ounces semisweet chocolate, melted
1/2 cup sour cream

In a medium bowl, mix together chocolate crumbs and melted butter until well-blended. Press into 9-inch a springform pan.

Preheat oven to 300 degrees.

Next, make the filling. Ina large bowl, beat together cream cheese, sugar, and eggs at medium speed until smooth and fluffy. Spoon half of cream cheese mixture into crust.

Stir chocolate into remaining cream cheese mixture until well-blended. Drizzle over batter in crust to make swirls.

Bake for 50 minutes. Transfer pan to a wire rack and cool completely. Transfer cheesecake to a serving plate, cover with plastic wrap and chill for 2 hours.

Uncover cheesecake and carefully remove the side of the pan. To make the frosting, mix chocolate and sour cream together in a small bowl. Spread over cheesecake and chill briefly until set.

12 April 2009

The Easter Coco-Bunny

This coconut cake I made for Easter was very pretty, but not very good. So, I'm not even listing the recipe. Here are the pretty, pretty pictures, though. However, the Seven-Minute Frosting was good; I'll post that.


Seven-Minute Frosting
Makes frosting for 2 layers

2 egg whites
1 1/2 cups sugar
1/4 teaspoon cream of tartar
1/3 cup water
1 1/2 teaspoon vanilla
1/4 teaspoon salt

Beat egg white, sugar, cream of tartar, water, and salt in the top of a double boiler, using an electric mixer at top speed.

After one minute, cook over boiling water while continuing to beat with the mixer. Continue cooking and beating the mixture until firm enough to hold peaks.

Remove from heat, beat in the vanilla, and beat until thick enough to spread well.

07 March 2009

And Eating It Too

This post is actually about something I ate, but didn't make. My mom found a cake recipe she wanted try in the latest issue of Epicurious.


She rarely has the time or ability (what with me hogging the oven) to bake anything, so she leapt at the chance and made the cake while I worked one night. She and my dad even waited to cut it until after I got home so that I could take pictures, awww.


This cake was delicious; the glaze was sweet and tart at the same time, and the cake was moist all over and a little salty in contrast to the glaze. The blueberry sauce on top was warm, sweet, and sticky, and an excellent addition to the cake.


Lemon Glaze

1 1/2 cups packed powdered sugar, sifted
2 tablespoons or more fresh lemon juice

Combine powdered sugar and 2 tablespoons lemon juice in a small bowl. Stir with a spoon until smooth and paste-like, adding more lemon juice by 1/2 teaspoonfuls if glaze is too thick to spread. Set aside.


Lemon Cornmeal Cake
Makes 8 to 10 servings

1 1/2 cups all-purpose flour
1/3 cup yellow cornmeal
3/4 cup sugar
3 1/2 teaspoons baking powder
1/2 teaspoon salt
1 cup buttermilk
2 large eggs
1 tablespoon finely-grated lemon peel
3/4 teaspoon vanilla extract
1/2 cup unsalted butter, melted, cooled

Preheat oven to 350 degrees. Butter a 9-inch round cake pan with at least 2-inch-high sides; line bottom with parchment.

Combine flour, cornmeal, sugar, baking powder, and salt in a large bowl; whisk to blend. Whisk buttermilk, eggs, lemon peel, and vanilla in small bowl. Pour buttermilk mixture and melted butter into flour mixture. Using a rubber spatula, gently fold liquids into flour mixture until just blended (do not stir). Scrape batter into pan and spread evenly.

Bake cake until tester inserted in the center comes out clean and cake pulls away from the sides of the pan, about 30 minutes.

Immediately run a knife around the sides of the cake. Invert the cake onto a rack or plate; while the cake is still hot, drop glaze by tablespoonfuls and spread to within 1/2 inch of the edge.


Crushed-Blueberry Sauce
Makes about 1 1/2 cups

3 cups fresh or frozen blueberries, thawed (13 to 14 ounces), divided
2/3 cup packed golden brown sugar
2 teaspoons fresh lemon juice
1/2 teaspoon finely-grated lemon peel
Pinch of salt

Combine 1 1/2 cups blueberries and all remaining ingredients in medium saucepan. Stir over medium heat until sugar dissolves and mixture comes to simmer, about 7 minutes.

Reduce heat to medium-low and simmer until berries are very soft and liquid is syrupy, stirring often, about 7 minutes.

Remove from heat and add remaining blueberries. Using back of spoon, gently press fresh blueberries against side of pan until lightly crushed.

15 February 2009

Having Your Cake

After a particularly heavy and delicious dinner, my father customarily asks, "What's for dessert?" often referencing an imaginary double-decker fudge cake that our imaginary maid has slaved over all day.

Yum


The recipe for this cake is simple enough, considering I used a box mix for the actual cake.
Since ease and speed were the goals of this whole operation, I used the recipe for chocolate frosting on the back of our Hershey's Cocoa container. If you are interested in making the cake as well, there's also a recipe for a corresponding cake on the label.

Man, I want more of this frosting


I have to say that the cake was pretty good, but the frosting was spectacular. The consistency was perfectly spreadable, but stiff enough to hold its shape; the balance between sugar and chocolate was ultimately delicious.

Hershey's Perfectly Chocolate Frosting
Makes about 2 cups

1/2 cup butter or margarine
2/3 cup cocoa
3 cups powdered sugar
1/3 cup milk
1 teaspoon vanilla extract

In a glass container, melt the butter in the microwave. Add cocoa to melted butter.

Alternately add the powdered sugar and milk, beating on medium speed, until spreading consistency is reached.

If needed, add more milk. Stir in vanilla. Frost your cake!

25 December 2008

Not Enough Time For Martha

When I received my Holiday edition of Martha in the mail, I saw this glorious dessert that I definitely wanted to serve for Christmas: the Chocolate-Coconut Charlotte. It was everything I'd ever wanted in a holiday dessert - a combination of flavors and custards with crispy, homemade chocolate ladyfingers encircling the delicious layers, and just too much work on top of my French Onion soup and Prime Rib Roast. My usual reaction is to take on the stress until I've gone so insane that I could not possibly enjoy either the creation or the demolition of the masterpiece. I didn't make the damn thing.

Oh, the glory


The Holiday edition of Cooking Light came next in the mail, and lo and behold, there was my simplified Christmas dessert. The recipe calls for ten 4-ounce individual ramekins; we had six, so we improvised. For some reason, I didn't even think of how this would affect the bake time, which resulted in the cakes being much less gooey on the inside than desired.

Mmmm, gooey


But we prevailed, and everyone managed to eat just about half of their little cake. It was then that everyone wanted to know how they would take it home without stealing my ramekins. And I was at a loss. I think we popped them out of the container and wrapped them in saran wrap or something. Anyway, these were quick and easy. When cooked properly, they are a little bit crispy on top and hot and gooey on the inside. The sprinkling of powdered sugar makes them look elegant and simple. Just be sure to assemble them at least four hours ahead, as they need to sit in the refrigerator for that long.

My grandparents were confused as to why I was taking pictures


Hot Chocolate Fudge Cakes
Makes 10 individual servings, somehow (we only had 6, which greatly affected the cook time)

3.4 ounces all-purpose flour (about 3/4 cup)
2/3 cup unsweetened cocoa
5 teaspoons instant espresso powder
1 1/2 teaspoons baking powder
1/4 teaspoon salt
1/4 cup unsalted butter, softened
2/3 cup granulated sugar
2/3 cup packed brown sugar
1 cup egg substitute
1 1/2 teaspoons vanilla extract
1 (2.6-ounce) bar dark (71% cocoa) chocolate (such as Valrhona Le Noir Amer), finely chopped
2 tablespoons powdered sugar

Weigh or lightly spoon flour into dry measuring cups; level with a knife. Sift together flour, cocoa, espresso powder, baking powder, and salt.

Place butter in a large bowl; beat with a mixer at medium speed 1 minute. Add granulated and brown sugars, beating until well blended (about 5 minutes). Add egg substitute and vanilla, beating until well blended. Fold flour mixture into sugar mixture; fold in chocolate. Divide batter evenly among 10 (4-ounce) ramekins; arrange ramekins on a jelly-roll pan. Cover and refrigerate for at least 4 hours, but no more than 2 days.

Preheat oven to 350 degrees. Let ramekins stand at room temperature 10 minutes. Uncover and bake at 350° for 21 minutes or until cakes are puffy and slightly crusty on top. Sprinkle evenly with powdered sugar; serve immediately.

17 September 2008

Double Decker Chocolate Cake

For the record, this chocolate cake was a complete disaster. I was trying to put it together in the two hours between class and work and...well, I finished it, but I broke things, burnt chocolate, and melted a plastic measuring cup.

The only okay picture from the set


On top of this, I have a bad habit of not reading completely through recipes, so when I got to the frosting, I panicked - I've never done anything with custard before. Besides melting a few things, though, it turned out well.

I like the air bubble in this picture


I'm not a fan of chocolate cake, but I was craving one and this one satisfied my craving. It got better after a night in the refrigerator in terms of moistness, but other than that, it was a keeper.

Chocolate Layer Cake with Milk Chocolate Frosting
Makes one two- or four-layer cake

2 cups all-purpose flour
2/3 cup unsweetened cocoa powder (not Dutch-process)
1 1/2 teaspoons baking soda
1/2 teaspoon salt
1 cup unsalted butter, softened
1 cup packed dark brown sugar (I used half dark, half light)
3/4 cup granulated sugar
4 large eggs
2 ounces unsweetened chocolate, melted and cooled
1 1/2 teaspoons vanilla
1 1/2 cups well-shaken buttermilk (or 1 1/2 cups milk mixed with 1 1/2 tablespoons vinegar)

2/3 cup whole milk (I used 1%)
3 large egg yolks
1 tablespoon plus 1 teaspoon all-purpose flour
1 1/3 cups confectioners sugar
1 teaspoon vanilla
1 1/2 cups unsalted butter, cut into tablespoon pieces and softened
8 ounces milk chocolate, melted and cooled
2 ounces unsweetened chocolate, melted and cooled


Put the oven rack in middle position and preheat oven to 350 degrees. Butter 2 (9- by 2-inch) round cake pans and line bottom of each with a round of parchment or wax paper (I actually skipped this part and the cake popped right out of the pan still). Butter paper and dust pans with cocoa powder, knocking out excess.

Sift together flour, cocoa, baking soda, and salt into a small bowl. Beat together butter and sugars in a large bowl using an electric mixer at medium-high speed until light and fluffy, 3 to 4 minutes in a standing mixer or 4 to 5 minutes with a handheld. Add eggs 1 at a time, beating well after each addition. Add chocolate and vanilla and beat until just combined. Reduce speed to low and add flour mixture and buttermilk alternately in 3 batches, beginning and ending with flour mixture and mixing until just combined.

Divide batter between cake pans, spreading evenly, and bake until a wooden pick or skewer inserted in center of each cake layer comes out clean, 25 to 35 minutes. Cool cake layers in pans on racks 10 minutes. Run a thin knife around edge of each layer, then invert onto racks. Peel off paper and cool layers completely.

While waiting for the cake to cool, make the frosting. Heat milk in a 1- to 1 1/2-quart heavy saucepan over moderate heat until hot. Whisk together yolks, flour, 1/3 cup confectioners sugar, and a pinch of salt in a bowl, then add hot milk in a stream, whisking. Transfer custard to saucepan and bring to a boil over moderate heat, whisking. Reduce heat and simmer, whisking, 2 minutes (mixture will be very thick), then transfer to a large bowl. Cover surface of custard with a buttered round of wax paper and cool completely, about 45 minutes.

Add vanilla and remaining cup confectioners sugar to custard and beat with cleaned beaters at moderate speed until combined well, then increase speed to medium-high and beat in butter, 2 tablespoons at a time, until smooth. Add chocolates and beat until combined well.

If you want a four-layer cake, halve each cake layer horizontally using a long serrated knife. Layer cake, using a heaping 1/2 cup frosting between each layer, then frost top and sides with remaining frosting.

14 August 2008

Milk-Free Birthday

I have always wanted to make milk-free icing for my boyfriend, but I don't usually make him frosted cakes and thus have never had a chance to do so. However, today is gb's 20th birthday and to celebrate, I made him a yellow cake with Vegan Vanilla Buttercream Frosting. Unfortunately, the original recipe was...somewhat off. It called for 1/8 cup of soy milk right off the bat and I just measured it out without questioning it; anyway, it turned out to be way too much and the frosting was much too wet; plus, I was afraid to add more powdered sugar because it was already extremely sweet. Even though the frosting was runny, gb loved it anyway and told everyone about the "awesome birthday cake" that I had made him.


Vegan Vanilla Buttercream Frosting
Makes enough to frost two-layer cake

1 cup soy margarine, softened
1 to 3 tablespoons or more soy milk, rice milk, or other non-dairy milk of choice
6 cups Veganized Powdered Sugar
3 teaspoons vanilla

Using an electric mixer or in a large bowl with a hand held mixer, place the soy margarine and soy milk, and cream them together. Add half of the sugar, and beat well to combine. Add the remaining ingredients and continue to beat the mixture until light and fluffy.

12 July 2008

Birthday Cake: Sheeit

As many (or few of you) may or may not know, I work at a coffee shop named Iron Horse (IHCC) in the old downtown district of Rogers. July 10th was IHCC's 10th year in business and our boss decided we would give out free cake in celebration; so I volunteered to make a vanilla sheet cake.

In all of it's glory


The same day I made this cake, my grandpa had also returned home after three months in the hospital, so the decorating was a little rushed, and I ended up getting the colors of the diamonds out of order. (The diamonds are usually red-blue-yellow-green and say "IHCC" inside of them.) I'm told this did not affect the taste.

I had a doctor's appointment on the morning of the tenth after which I went grocery shopping. When I finally had a chance to go by the shop at 4 to get my slice of free cake, it was all gone. Oh well.

I had so much of the colored frosting left over.


I used a basic vanilla buttercream frosting recipe that I found on the Food Network website; it was the first time I had used it and I was really impressed by the simplicity and deliciousness of it. I will definitely be using it again for cupcakes and the like. Just as a note, I did a double recipe, using one recipe as the white frosting and dividing the other half into fourths and coloring them.

Quick Vanilla Buttercream Frosting
Makes enough to ice 13x9 sheet

3 cups (or more) confectioners' sugar
1 cup butter
1 teaspoon vanilla extract
1 to 2 tablespoons whipping cream

In a standing mixer fitted with a whisk, mix together sugar and butter. Mix on low speed until well blended and then increase speed to medium and beat for another 3 minutes.

Add vanilla and cream and continue to beat on medium speed for 1 minute more, adding more cream if needed for spreading consistency.

If you want to color the frosting, add the food dye one drop at a time, stirring thoroughly between each drop. Be sure not to use too much dye, as this can lead to an unpleasant taste and colored tongue.

30 June 2008

Cake Pops

As far as I can tell, Cupcake Pops originated with Bakerella, and are adorable and somewhat trying and require much more patience than I have available. However, I decided to make a variation of them that I've seen in multiple spots on the blogosphere, which are a simplified version. Basically, they are Cake Pops, just balls of cake and frosting on a lollipop stick that have been dipped in melting chocolate. It sounds like a sugar overload, but eating just one is quite delicious. As some of my friends found out, eating three very quickly can make you very sick(ly).

They are so cute and colorful


The recipe is, by far, one of the most basic I've ever seen. On top of that, the flavor combinations are endless. You can pair any cake flavor with any icing flavor with any color for the outside. I decided to make two different choices: White cake with strawberry frosting and pink melting discs and brownies with milk chocolate frosting and regular semisweet melting chocolate. Both were equally delicious, although I found that the flavor really fully saturated and tasted better after about a day in the refrigerator.

Yum yum, sugar


The only issues I had with these occurred with the white cake mix. The original posts and recipes I read on Cupcake pops and such recommended mixing the cake and frosting while the cake was still warm. I waited until mine was mostly cooled and I still had a very hard time trying to get it to stick together when I rolled it into a ball. I figured out eventually that if I wiped my hands completely and kept them a little damp after each ball I formed, the next ball would not stick as much.

I had cake all over my hands


The dipping was also a little trying, as I almost ran out of the pink melting discs; I had fewer pops than I orinally started out with too because my brother had found them in the outside refrigerator and decided to help himself. So I guess I would suggest...buying an extra bag? Or just leaving a few lightly-dipped. The brownies were much easier to coat because I just added chocolate chips to my melting chocolate to produce more to dip.

Zooom


Because I wasn't able to take homemade cupcakes into the bowling alley for my birthday party, I made these and packed them in goody bags to hand out when everyone left. Each person received two brownie pops and two strawberry pops. gb's sister liked them so much that she offered to pay me to make a whole other batch for her. I think I will probably take her up on it.

All packed up in their goody bags and ready to go


Cake Pops
Makes 30 to 45 cake pops, depending on size

1 (18.25 ounce) package cake or brownie mix
Eggs, water, and oil called for on cake mix box
16 ounces of store-bought or homemade frosting
1 (1 pound) package of melting chocolate or colored vanilla melts

Combine cake ingredients according to directions on box. Bake the cake in a 13x9-inch pan at the temperature and time noted on box. NOTE: A homemade sheet cake can also be used, if you'd like. Remove the cake from the oven when cooked and cool for about half an hour.

Scrape the entirety of the cake out of the pan and into a very large bowl. Then, add the frosting and stir vigorously until all the cake is in fine crumbs and the mixture is completely stuck together. Roll the mixture into one- to two-inch balls and place on a cookie sheet covered in wax paper. If using lollipop sticks, poke them into the balls. Refrigerate for at least three hours, preferably overnight.

At this point, the cake balls should be quite stiff. Heat the melting chocolate/vanilla/whatever in a saucepan over medium-low heat, stirring constantly so as not to burn any of it (like I did). Turn the burner off and begin to dip the cake balls, making sure to cover each one completely and thoroughly in the melted substance. Place the pops back on the baking sheet and, after all of them are dipped, back in the refrigerator for at least two to three more hours.

Birthday Cake: Strawberry

I'm kind of cursed when it comes to basic layer cakes. Although they always taste delectable, I can never manage to make them look edible, let alone pretty. They're either crooked or falling apart or just plain ugly; plus, I've never ever been able to pop a layer out of a nine-inch pan completely intact. It's just something that had never happened for me until this cake.

The glory


My birthday cake was a strawberry cake with strawberry cream cheese frosting that I found at some point on Recipezaar. I have actually been wanting a strawberry cake since I realized I had never eaten one back in February; I waited until my birthday to make one so that the strawberries would be ripe and in season and I was extremely satisfied with the results.

The batter will turn a lovely pink shade


While looking for a recipe that suited my tastes, I kept in mind that, above all, I wanted lots of fresh strawberries to be used and I wanted the cake to be pink. This recipe was convenient because I love cream cheese frosting.

Ready to bake


However, I should probably address some of the issues I had with the frosting; I'm guessing that during the "thorough draining" of the mashed strawberries, some not-so-thorough work went on. All I really had on hand that I could think of using was a sieved spoon, so I picked up small amounts of the mashed berried and mashed them a little more while they were in the spoon, thinking this would lead to getting rid of all of the juices. Obviously, it didn't, which made the frosting a little apprehensive to set; I had to leave the cake in the refrigerator for a little under two days, so I pulled it out every four hours or so to swirl the frosting back up the cake because it had already dripped down into a puddle. I noticed around the last few hours before we ate it that I didn't need to push it up as much, so I guess the frosting finally decided to give up the battle and just stay put.

Closeup of the frosting


Anyway, this didn't take away from the taste at all; it was delicious and the coconut and pecan, which I originally thought were fairly out of place in the recipe, ended up adding a nice crunch and texture to the finished product. Of all of the people that ate the cake, my mom was the only one who disliked it and then it was only due to the coconut and pecan. I will probably make this again sometime sans crunchy stuff.

It looks like the cake was too hot, but it was completely cooled


Also, I had a lot of the frosting left over, and I don't know if that was due to the fact that it never thickened up or if it was just because the recipe was specifically for three nine-inch pans and I only used two. Either way, if I hadn't let it sit in the refrigerator for a week and a half, I would have been able to make cupcakes with it and they would have been delicious.

Tub of frosting


I didn't do the best job with taking pictures of all of the steps included in this recipe, as I was really set on making it actually look good. This is unfortunate because it is probably one of the prettiest cakes I have ever made.

19 years old, not seven


Strawberry Cake
Makes one 9-inch (2 or 3) layer cake, about 18 servings

Vegetable shortening, for greasing the pans
Flour, for dusting the pans
1 (18.25 ounce) package plain white cake mix
1 (3 ounce) package strawberry gelatin
1 cup mashed fresh strawberries, with juice (1 1/2 cups whole berries)
1 cup vegetable oil
1/2 cup whole milk (I used 1% and it worked fine)
4 large eggs
1/2 cup grated sweetened coconut
1/2 cup chopped pecans
Strawberries, sliced, for garnish
1 batch Strawberry Cream Cheese Frosting

Place a rack in the center of the oven and preheat the oven to 350 degrees. Lightly grease two or three 9-inch round cake pans with solid vegetable shortening, then dust with flour. Shake out the excess flour and set the pans aside.

Place the cake mix, strawberry gelatin, mashed strawberries and juice, oil, milk and eggs in a large mixing bowl and blend with an electric mixer on low speed for 1 minute. Stop the machine and scrape down the sides of the bowl with a rubber spatula.

Increase the mixer speed to medium and beat for 2 minutes more, scraping the sides down again if needed. The strawberries should be well blended into the batter. Fold in the coconut and pecans. Divide the batter among the prepared pans and place them in the oven; if you are using two pans, simply place them on the middle rack; if you are using three and your oven is not large enough, place two pans on the center rack and place the third pan in the center of the highest rack.

Bake the cakes until they are light brown and just start to pull away from the sides of the pan, 28 to 30 minutes. Be careful not to overcook the layer on the highest oven rack. Remove the pans from the oven and place them on wire racks to cool for 10 minutes. Run a dinner knife around the edge of each layer and invert each onto a rack, then invert again onto another rack so that the cakes are right side up. Allow them to cool completely, 30 minutes more. (Okay, I didn't do the multiple inversions; I placed them on little hotpads in front of a fan that was on high for about 30 to 45 minutes until they were mostly cool.

To assemble, place one cake layer on a serving platter. Spread the top with frosting. (At this point, I used a thin layer of frosting on top of the first layer; then I added thinly sliced strawberries and added another thin layer of frosting on top of the slices.) Add another cake layer, right side up, and frost the top. Repeat this process with the third layer and frost the top. Use the remaining frosting to frost the sides, working with clean, smooth strokes. Decorate the top layer with sliced strawberries, if desired. Serve at once or chill the cake for later serving. (I recommend chilling it - it really helps bring out the strawberry flavor.)

Place this cake uncovered, in the refrigerator until the frosting sets, 20 minutes (or 2 days, if you're me: that's how long it took to start to set). Cover the cake with waxed paper and store, in the refrigerator, for up to 1 week. Or freeze it, wrapped in aluminum foil, for up to 6 months. Thaw the cake overnight in the refrigerator before serving. This cake is best served cold.


Strawberry Cream Cheese Frosting
Makes a ton of frosting
8 ounces cream cheese, softened
1/2 cup butter, softened
3 1/2 cups confectioners' sugar, sifted (I probably used about 5 cups, just trying to get the frosting to thicken up)
3/4 cup fresh ripe strawberries, rinsed, capped and mashed to make 1/2 cup, then drained well
1/3 cup grated sweetened coconut
1/3 cup chopped pecans

Combine the cream cheese and butter in a medium bowl with an electric mixer on low speed for about a minutes. Stop the machine and add the powdered sugar and drained strawberries (IMPORTANT: If the strawberries are not completely drained, the frosting will not set). Blend the frosting on low until the sugar is completely incorporated; then, raise the speed to medium and mix the frosting for another few minutes until the frosting lightens and is well combined. Fold in the coconut and pecans.


By the way, if anyone was wondering, I have not yet made the Coconut Cream Pie for my grandpa because we are waiting until he gets out of the hospital on July 14th to surprise him with it. But I still need to post about Cake Pops, and that's worth waiting around for!

22 June 2008

The Truth About Coffee Cake

Today I'm going to talk about coffee cake. My boyfriend (gb) pointed out that I hadn't really posted anything about original recipes and suggested that I do so; this was really the only recipe I could think of that was mostly me, so I think it might have been something of a scam for him to get a coffee cake.

My loving poopsyscmoo


gb doesn't like cake much, but this is the exception - he could probably eat an entire one in two or three days. Luckily for him, I really enjoy making it because it's super-easy and I usually have all of the ingredients on hand. Plus, it only takes me about seven or eight minutes to throw it together and it always comes out perfect.

Note the disposable aluminum pan


One specific thing to keep in mind with this recipe is your pan. I have always made these on those flimsy aluminum disposable 13x9's and they are always perfectly moist and crunchy after 38 minutes. The only time I have ever had problems with this recipe occurred when I used a plain metal baking pan - the cook time was off. Also, do not increase the amount of cinnamon too much, or it bakes into the cake and the crunch of the cinnamon-sugar is lost.

A fancy close-up


AwesomePossum Coffee Cake
Makes one 13x9-inch cake, about 24 servings

1 (18.25-oz.) box yellow cake mix
1 large box instant vanilla pudding mix (sorry, I don't know the exact ounce-age on this one)
4 large eggs
1 cup water
1/2 cup vegetable oil
1 teaspoon vanilla
1 to 1 1/2 teaspoons cinnamon

1/2 cup sugar
2 teaspoons cinnamon
1/2 to 1 cup nuts, chopped (optional)

Preheat oven to 350 degrees. Grease and flour a bundt or 13x9-inch pan (I've never actually made it with a bundt pan; I usually don't have much luck with them).

First, make the filling/topping: stir together the sugar, cinnamon, and nuts in a small bowl until completely combined (I usually use a fork instead of a spoon - it helps the cinnamon-sugar combine easier). In a large mixing bowl, sift together cake and pudding mix. Whisk in eggs, water, oil, vanilla, and cinnamon until mixture is completely smooth. Pour a little more than half of the batter into pan.

Sprinkle more than half of the cinnamon-sugar mix over the batter, making sure to cover most of it evenly. Then, top with the remaining batter; try to cover the entire first layer. Sprinkle more of the cinnamon-sugar over the top layer, saving a small amount. Take two butter knives and move them in opposite directions through the pan, marbelizing the cake until the cinnamon-sugar is spread evenly throughout. Then top with the remaining cinnamon sugar.

Bake for 38 to 40 minutes, until a toothpick inserted in the center comes out clean. If you're lucky, a thin but crunchy crust will rise up on top of the cake.


Stay tuned later on for my birthday cake and a really easy coconut cream pie I'm making for my grandpa this week.