26 December 2010

On the Twelfth Day of Christmas, My True Love Gave to Me...

As you can see, I've been cracking open Dorie Greenspan's Baking from My Home to Yours more frequently as of late; and instead of just sighing at the beautiful pictures, I've been more motivated to try recipes out.


For Christmas dessert, I made this Brownie Cake with a caramel topping. The cake was really a no-brainer and it ended up tasting just like a brownie leaning more toward the cake-end of the brownie spectrum. The caramel was exciting for me; I've only made caramel once or twice before and each time I forget how to do it.


More notably, I forget how boring it is to sit there and wait and wait and wait and wait and wait for the caramel to change colors slightly while worrying that you'll miss it and that it will burn and everything will be ruined forever. That may be an exaggeration, but that's how I felt watching the caramel for seven minutes without blinking once. In the end, the waiting paid off and the caramel was salty and sweet and the brownie cake paired with it perfectly.


Caramel-Peanut-Topped Brownie Cake
Makes about 12 servings

1 cup all-purpose flour
1 teaspoon baking soda
1/4 teaspoon salt
8 tablespoon butter, cut into 8 pieces
5 ounces bittersweet chocolate, coarsely chopped
3 large eggs
1/2 cup packed light brown sugar
1/4 cup sugar
3 tablespoon light corn syrup
1/2 teaspoon vanilla extract

2 cups sugar
1/2 cup water
1 1/2 tablespoons light corn syrup
2/3 cups heavy cream
2 tablespoon unsalted butter, at room temperature
1 cup salted peanuts

Center a rack in the oven and preheat the oven to 350F. Butter an 8-inch spring-form pan, dust the insides with flour, tap out the excess, line the bottom of the pan with a parchment paper. Place the springform pan on a baking sheet.

To make the cake, combine the flour, salt and baking soda in a small bowl. Whisk together to mix and set aside. Add the butter and chocolate to a heatproof bowl and set over simmering water. Heat, stirring occasionally, until the ingredients are melted - do not let them get so hot that the butter separates. Remove the bowl from heat and set aside.

In a large mixing bowl, whisk together the eggs and sugars till well-blended. Whisk in the corn syrup, followed by the vanilla. Add in the melted butter and chocolate mixture, and whisk till combined. Gently whisk in the dry ingredients, mixing only until they are incorporated. The batter should be thick, smooth and shiny. Pour it into the prepared pan and jiggle the pan a little to even out the batter.

Bake for 40-45 minutes or until a thin knife inserted in the middle comes out almost clean. Transfer rack to a pan to cool for 15 minutes, then run a knife gently between the pan and the cake and carefully remove the sides of the springform pan. The cake may have puffed up during baking, but don't be concerned if it develops a crater in the center while cooling. Allow to cool to room temperature. When the cake is completely cool, invert it, remove the base and peel off the parchment paper. Wash and dry the pan, place the cake back into the clean pan, right side up, and fasten sides.

To make the topping: combine the sugar, water and corn syrup in a heavy, medium-sized pan, stirring just to combine the ingredients. Place the pan over medium high heat. Heat, without stirring, till the caramel turns amber (5-10 minutes). As the sugar is caramelizing, wipe down any splatters on the sides of the pan with a pastry brush dipped in cold water. To test the color of the caramel, drop a bit onto a white plate. Don't be timid about the color - if it's too pale, it won't have much flavor.

Lower the heat a bit, stand back and add the cream and butter. When the sputters are less vehement, stir to calm down the caramel and dissolve any lumps. Stir in the peanuts and pour the mixture into a 1-quart Pyrex measuring cup or other heat-proof bowl.

You will have more caramel than you need, but you want to get all the peanuts onto the cake, so spoon out all the peanuts out of the hot caramel and onto the cake. Pour or spoon over enough caramel to cover all the nuts, drizzling a little over the edges of the cake for presentation. Allow the topping to set at room temperature, about 20 minutes, before serving. Keep the leftover caramel at room temperature and save for another use.

Turduckery.

Over Thanksgiving Break, my mom and I went to St. Louis to tour Le Cordon Bleu and go shopping. While we were there, we picked up a food magazine called Feast that featured a recipe for Bacon-Wrapped Turducken. Our minds were immediately made up and we decided that we would finally attempt and conquer the Turducken.


I'm happy to say we both created and conquered the Turducken with relative ease. Finding the duck proved harder than we both thought, but was well worth the effort. This meat-roulade turned out to be delicious. Wrapping it in bacon added another dimension. The bacon dimension. And we all know that that is the tastiest dimension of them all.


Bacon-Wrapped Turducken
Makes about 12 servings

6 cups water
1/3 cup kosher salt
1 boneless, skinless turkey breast
2 boneless, skinless duck breasts
2 tablespoons chopped fresh sage
2 tablespoons chopped fresh thyme
Salt and freshly ground black pepper
2 boneless, skinless chicken breasts
12 slices hardwood smoked bacon
Butcher’s twine
2 tablespoons olive oil
Bring water and salt to a boil in a large pot, and then remove from heat. Once cool, submerge turkey breast in brine for at least 1 hour, up to 12 hours. Remove turkey and pat dry.

Preheat oven to 325 degrees. Place turkey breast on a large cutting board and cover with a large piece of plastic wrap. Using a meat mallet, gently pound the turkey to an even 1/4-inch thickness. Do the same with the duck and chicken breasts.

Season the turkey, duck, and chicken breasts with fresh herbs, salt, and pepper. Lay the turkey breast flat, and then top with the duck breasts. Top the duck breasts with the chicken breasts. Bring the sides of the breasts up into a log shape and press together to hold, creating a roulade. Set aside.

Layer the bacon, slightly overlapping, on the cutting board. Place the roulade on top of the bacon, seam side up. Bring the bacon up around the roulade, overlapping the ends. Truss with butcher’s twine to secure.

Place the olive oil in a large nonstick pan over high heat. Once hot, add roulade and turn on all sides to sear bacon. Place roulade on a parchment-lined baking sheet and bake for 90 minutes, or until an internal temperature of 170 degrees is reached. Allow to rest for 10 minutes before slicing.

French Kissed

French Toast is my very favorite breakfast food. Well, maybe it's even with pancakes. But I consider French Toast to be much more of a treat than pancakes. Maybe it's because my mom used to serve it to me with clear syrup, and I thought that was the coolest thing when I was seven years old. Or maybe it's because I had a love/hate relationship with it when I was younger. I used to love the soggy bread but hate the egg bits on the sides. The older I've gotten (I'm quite old), the more I love the egg, though.


I was in charge of all the meals on Christmas this year, so I picked Baked French Toast for breakfast. First of all, I should mention that I cut the bread in the recipe but didn't think to cut the egg concoction, so our end result was much more eggy and soggy than a normal batch would have produced. It was pretty great, though; sort of like a scrambled egg/bread pudding combination. With syrup on top.


Baked French Toast
Makes about 10 servings
1 loaf French bread, cut diagonally in 1 inch slices
8 eggs
2 cups milk
1 1/2 cups half-and-half cream
2 teaspoons vanilla extract
1/4 teaspoon ground cinnamon
3/4 cup butter
1 1/3 cups brown sugar
3 tablespoons light corn syrup

Butter a 13x9 inch baking dish. Arrange the slices of bread in the bottom. In a large bowl, beat together eggs, milk, cream, vanilla and cinnamon. Pour over bread slices, cover, and refrigerate overnight.

The next morning, preheat oven to 350 degrees. In a small saucepan, combine butter, brown sugar and corn syrup; heat until bubbling. Pour over bread and egg mixture. Bake in preheated oven, uncovered, for 40 minutes.

03 November 2010

The Cake that I Lit on Fire

Dorie Greenspan tells a really great story about this cake in her book, Baking from My Home to Yours. I can't top it. She calls it "The Cake that Got Me Fired."


I didn't have any armagnac, so I ended up using brandy. I also didn't have prunes, so I just took those out. This means that I just lit the brandy on fire in a pan - which was easily the most exciting part of making this cake. The cake in itself was really spectacular - moist, dense, and chewy with the heavenly ganache topping it off just right. I preferred it refrigerated, so that the chocolate was even denser and seemed to melt in my mouth.


Chocolate Armagnac Cake (Modified for Wussies)
Makes about 12 servings

2/3 cup finely ground pecans (or walnuts)
1/4 cup all-purpose flour
1/4 teaspoon salt
3 tablespoons water
1/4 cup Armagnac (or cognac, brandy or Scotch whisky)
7 ounces bittersweet chocolate, coarsely chopped
1/2 cup unsalted butter, cut into 4 pieces
3 large eggs, separated
2/3 cup sugar

3 ounces bittersweet chocolate, coarsely chopped
3 tablespoons confectioners’ sugar
3 tablespoons unsalted butter, at room temperature

Center a rack in the oven and preheat the oven to 375 degrees. Butter an 8-inch springform pan, fit the bottom of the pan with a round of parchment or wax paper and butter the paper. Dust the inside of the pan with flour and tap out the excess. Put the pan on a baking sheet lined with parchment or a silicone mat.

Whisk together the nuts, flour and salt. Preheat a pan on the stovetop for three minutes; remove the pan and pour in the Armagnac. Stand back and set it aflame.

Combine the chocolate, butter and water in a heatproof bowl, set it over a pan of simmering water and stir occasionally until the chocolate and butter are melted; or do this in a microwave oven. Remove the chocolate from the heat just as soon as it is melted and not very hot—you don’t want the chocolate and butter to separate.

In a large bowl, whisk the egg yolks and sugar together until thick and pale, about 2 minutes. Switch to a rubber spatula and, one by one, stir in the chocolate and butter mixture as well as the nut mixture.

Working with a stand mixer fitted with the whisk attachment or with a hand mixer in a large bowl, beat the egg whites until they hold firm, glossy peaks. Stir about one quarter of the beaten whites into the chocolate mixture, and then gently fold in the remaining whites. Turn the batter into the pan.

Bake the cake for 28 to 32 minutes, or until it is puffed, firm on top and starting to come ever so slightly away from the sides of the pan; a thin knife inserted into the center will come out streaky—the cake should not be wet, but you don’t want it to be completely dry. Transfer the cake to a rack and let it cool for about 10 minutes, then carefully remove the sides of the pan. Invert the cake, pull off the paper and turn right side up to cool to room temperature. The cake should be absolutely cool before you glaze it.

If the cake has crowned, use a long serrated knife and a gentle sawing motion to even the top. Turn the cake over onto a cooling rack—you want the very flat bottom of the cake to be the top. Put a piece of wax paper or foil under the cooling rack to serve as a drip catcher.

To make the glaze, melt the chocolate in a heatproof bowl over a pan of gently simmering water, or in a microwave oven. Remove it from the heat and, using a small spatula, stir in the sugar, then the butter, a bit at a time, stirring until you have a smooth glaze.

Have a long metal icing spatula at hand. Pour the glaze over the top of the cake, allowing the excess to rundown the sides, and use the spatula to smooth the top of the cake if necessary—usually the glaze is a self-spreader—and to even it around the sides of the cake. Let the glaze set at room temperature or, if you want to speed it up, slide the cake into the refrigerator for about 20 minutes. If you’d like the glaze to be more like a frosting, let it cool until it is thick enough to spread, then swirl it over the cake.

The cake can be served at room temperature or chilled; it is more flavorful at room temperature but intensely fudgy when chilled.

15 October 2010

Livin' in the South

I took a Food and Wine Pairing class online where we had to take a traditional Southern recipe and update it. I guess I'm boring (or lazy) (or both) because I just went ahead and picked a pound cake. I also think of pound cake as being one of the most basic cakes.


I went through countless traditional recipes of pound cake, each asking for "a pound" of each ingredient. I updated the recipe, measurement-wise, and added a pecan element as a callback to the Southern requirement of the assignment. I also added a maple drizzle. Don't ask me. I don't know why.


This wasn't my favorite thing. But it's a pretty basic pound cake, when it comes down to it. If you're a big pound cake fan, then you should try this. Otherwise, maybe just look at the pretty pictures and feel satisfied in that.

Butter Pecan Pound Cake with Maple Drizzle
Makes about 12 servings

1 cup butter
1/2 cup shortening
3 cups granulated sugar
5 eggs
1 teaspoon rum (optional)
1 teaspoon vanilla extract
3 cups flour
1 teaspoon baking powder
1 cup milk
1 cup chopped pecans, plus 1/3 cup whole pecans
1/2 cup powdered sugar
3 tablespoons maple syrup

Preheat oven to 325 degrees. Grease and flour a Bundt pan.

Using paddle attachment on a standing mixer with a stationary bowl, cream together butter, shortening, and sugar until very fluffy, about seven or eight minutes. Add eggs, one at a time, beating until well-combined.

In a small bowl, combine rum and vanilla extract with milk. In another bowl, whisk together baking powder and flour. Alternately add liquid and dry ingredients to the butter mixture, starting and ending with liquid.

Stir in walnuts. Pour batter into prepared Bundt pan. Bake for about 70 minutes until cake tests done. In a small bowl, whisk together powdered sugar and maple syrup. Drizzle over the cake after it cools for twenty minutes. Sprinkle whole pecans over cake.

07 August 2010

Too Much of a Good Thing

My boyfriend has two simple favorites when it comes to food: peanut butter and bacon. In fact, he was the person to introduce to me the Peanut Butter and Bacon sandwich. As the girl that bakes for him on a regular basis, I am always trying to find more recipes that he will go nuts over. This cookie meets both of those qualifications.


Although I also really enjoy both peanut butter and bacon, I did not enjoy these as much as he did. I felt like the bacon added a somewhat unpleasant meaty flavor to the cookie, as opposed to a more smoky accent. This could also be due to the fact that I used extra bacon to make it extra bacon-y delicious.


Peanut Butter Bacon Cookies
Makes 1 1/2 dozen cookies

1 cup chunky or smooth peanut butter
1 cup sugar (1/2 cup brown sugar and 1/2 cup granulated sugar)
1 egg
1 teaspoon baking soda
6 to 8 slices of bacon, cooked, cooled and dices

Preheat oven to 350 degrees. In a skillet over medium high heat, fry up bacon until cooked through and let cool on paper towels until cool enough to dice. Dice up and set aside.

Grease a baking sheet with butter and set aside. In a mixer combine peanut butter and sugars until well combined, about 2 minutes. Add egg and baking soda and mix for another 2 minutes. Fold in cooked bacon. Roll into large walnut sized balls, roll in granulated sugar, and create a criss-cross pattern with a fork. Bake for 10 minutes, until lightly browned. Cool on a baking sheet for five minutes.

24 July 2010

Strawberries and Such

On the search for my Dream Cake, I frequently encountered recipes for strawberry cream cakes and strawberry shortcakes. Martha, as usual, made the most compelling bid, and I decided I should make it during the dog days of summer.


I know what you're thinking. Do I ever get tired of strawberries? The answer is, when it's 100 degrees outside, no. I never get tired of strawberries. On top of this, freshly whipped cream is one of my favorite things in the world. This slightly-sweet cake paired with the cold cream and the fresh strawberries make me think of...well, a relaxing treat on a hot summer's day.


Strawberry Cream Cake
Makes about 10 servings

1/2 cup (1 stick) unsalted butter, room temperature, plus more for pan
1 1/2 cups all-purpose flour (spooned and leveled), plus more for pan
2 teaspoons baking powder
1/2 teaspoon salt
1 cup sugar
2 large eggs plus 2 large egg yolks
1/2 teaspoon pure vanilla extract
1/2 cup whole milk
1 pound strawberries, hulled and thinly sliced
1 teaspoon unflavored gelatin (from a 1/4-ounce envelope)
1 1/2 cups heavy cream

Preheat oven to 350 degrees. Butter bottom of an 8-inch round cake pan, and line with parchment paper. Butter and flour paper and sides. In a medium bowl, whisk together flour, baking powder, and salt; set aside.

Using an electric mixer on high speed, beat butter and 1/2 cup sugar in a large bowl until light and fluffy. Add eggs and yolks, one at a time, beating well after each addition. Beat in vanilla. With mixer on low, alternately add flour mixture in 3 parts and milk in 2, beginning and ending with flour mixture; mix just until combined. Spread batter in prepared pan.

Bake until a toothpick inserted in center of cake comes out clean, 30 to 35 minutes. Cool in pan 10 minutes; invert onto a wire rack to cool completely. Using a serrated knife, split cake in half horizontally; place bottom half, cut side up, on a serving plate.

Make topping: In a large bowl, combine strawberries and 1/4 cup sugar; set aside. Place 2 tablespoons cold water in a small saucepan, and sprinkle with gelatin; let soften 5 minutes. Place saucepan over very low heat, and stir until gelatin is dissolved. Remove from heat; let cool.

Using an electric mixer, beat cream and remaining 1/4 cup sugar in a large bowl until very soft peaks form. Continue to beat, and gradually add gelatin mixture; beat until soft peaks form.

Arrange half of strawberries over bottom cake layer; top with half of whipped cream, leaving a 1-inch border. Cover with top half of cake, cut side down. Top cake with remaining whipped cream, leaving a 1-inch border. Refrigerate cake and remaining strawberries separately, at least 1 hour (or up to 1 day). Just before serving, spoon strawberries over cake.

27 June 2010

Blueberry Hill

My dad really likes to eat fresh blueberries during the summer. Let's face it, who doesn't like fresh fruit in the summer? Fruit is awesome.


Anyway, my mom and I made this cobbler from the recipe on the back of an old Bisquick box. It was quick, as the name would have you believe. Quick and delicious. I don't think there's anything wrong with using mixes, especially not when the result is this wonderful.


Bisquick Blueberry Cobbler
Makes about 10 servings

1/2 cup butter, melted
1 1/2 cups Bisquick baking mix
2/3 cup milk
1/2 cup sugar
1/2 teaspoon vanilla
3 cups fresh blueberries
2 tablespoon. sugar

Preheat oven to 350 degrees. Spray a 9-inch baking pan with nonstick cooking spray.

Measure milk into a bowl and stir in sugar until dissolved. Add vanilla and stir. Whisk in Bisquick just until combined.

Wash blueberries and pick over, removing stems. Toss blueberries in 2 tablespoons of sugar, or enough to coat. Mix blueberries into batter. Pour batter into prepared baking dish and bake in preheated oven for about 45 minutes or until golden brown.

Serve warm with vanilla ice cream or whipped cream topping. Toss a few extra blueberries over the topping.

23 June 2010

My Dream Cake

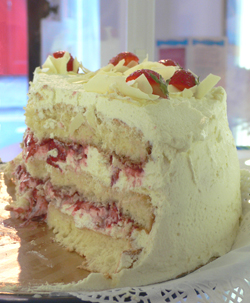
Sometime around the age of 16, I stumbled across this picture:


Since then, I have spent every birthday trying to recreate a cake that I only have photographic evidence of. After I did more research into my dream cake, I realized that it was actually an ice cream cake. I chose to ignore this and thought of it as a fluffy white cake with thick, creamy buttercream frosting, and a sweet strawberry filling. Until this year, I never really knew what it would taste like.

Until...


I'm going to go ahead and be honest here: this is the best cake I have ever made. Not only is it the prettiest, it tasted exactly the way the original picture looked. There was just the right amount of frosting, cake, strawberries, heaven, etc. It was moist, creamy, and tangy. It was my dream cake. And it came from this Frankenstein of a recipe.


Fluffy White Cake White Chocolate Frosting and Strawberry Filling
Also known as My Dream Cake
Makes about 12 servings

18 tablespoons (2 sticks plus 2 tablespoons) unsalted butter, room temperature, plus more for pans
4 1/2 cups cake flour (not self-rising) plus more for pans
1 1/2 cups whole milk
9 large egg whites, lightly beaten
1 tablespoon pure vanilla extract
1/2 teaspoon almond extract
2 tablespoons baking powder
1 1/2 teaspoons salt
2 1/4 cups sugar

9 ounces white chocolate, finely chopped
3 1/2 cups confectioners' sugar
1/2 cup milk
1 teaspoon vanilla extract
12 tablespoons (1 1/2 sticks/6 oz.) unsalted butter, softened
1/2 teaspoon salt

1 small carton strawberries, separated
Sugar, to taste

Preheat oven to 350 degrees. Butter and flour two 9-inch round cake pans, tapping out excess flour; set aside.

In a medium bowl, stir together, milk, egg whites, and extracts. Into a second medium bowl, sift together the flour, baking powder, and salt; set aside. In the bowl of an electric mixer fitted with the paddle attachment, beat the butter on medium speed for 30 seconds. With machine running, gradually add the sugar. Continue beating until light and fluffy, about 2 minutes. Scrape down sides of bowl as necessary.
Add one-third of the flour mixture and one-third of the milk mixture, and beat on low speed until just incorporated. Add remaining flour and milk mixtures in 2 separate batches beating between additions to fully incorporate. Scrape down sides of bowl, and stir by hand to finish.

Divide batter evenly between prepared pans. Smooth surface with a rubber spatula. Bake until top of cake springs back when lightly pressed and a cake tester inserted in the center comes out clean, 25 to 30 minutes. Let cakes cool in pans on wire racks for 5 minutes. Run a small metal spatula around the sides of the pan, and invert cakes onto greased racks. Reinvert cakes onto cooling rack. Let cool completely before filling.

To make the frosting, melt the white chocolate in a double boiler. Stir until smooth. Let cool to room temperature. Sift the confectioners' sugar into a medium bowl. Stir in the milk and vanilla. Add the butter and salt and beat until smooth. Stir in the cooled white chocolate. Refrigerate until firm enough to frost the cake, about 30 minutes.

To make the filling, mash up about ¾ of the carton of strawberries. Add in sugar, just a little at a time, until desired sweetness is reached. To assemble the cake, take one layer and cover with a thin layer of frosting and then cover with strawberry filling. Take the other layer and frost one side with a thin layer of frosting; lay this second layer, frosting side down, onto the first layer (so the order is cake-frosting-filling-frosting-cake). Frost the top and sides of the cake. Cut the remaining strawberries into decorative shapes and place on top and sides of cake. Top with white chocolate shavings.

01 May 2010

Chocolate Chocolate Chocolate

My brother takes after my mom in that he doesn't really go after sweets. They both like sweets alright, but unlike my dad and me, they don't have crazy cravings and super sweet tooths. I always have to coax my brother a little every year around his birthday to let me make him a cake of some sort. This year, he actually requested a chocolate cheesecake.


I've only ever made two other cheesecakes (my birthday cheesecake and the pecan pie cheesecake), so I was a little skeptical about baking this. Luckily, my buddy Emeril was here to guide me to a recipe that looked fairly easy. The end result was pretty great; it mixed a lot better than my birthday cheesecake and had a deep chocolate flavor. My brother enjoyed it, too. The only thing I would change if I made it again would be the strawberries - after about two days on the cheesecake, they started to get slimy and the cake touching the strawberries did the same.


New York Style Chocolate Cheesecake
Makes about 12 servings

1 1/2 cups chocolate wafer crumbs
1 cup plus 3 tablespoons sugar
2 1/2 (8 ounce) package cream cheese, softened at room temperature
1 1/2 teaspoons vanilla extract
1 vanilla bean, seeds scraped from inside of pod and reserved
3 tablespoons all-purpose flour
3 eggs
1 cup sour cream
8 ounces melted semisweet chocolate, cooled slightly
Fresh strawberries, for garnish

Preheat oven to 350 degrees (if using a light springform pan; or 325 degrees if using a dark nonstick springform pan).

Lightly grease the bottom and sides of a 9-inch springform pan. In a small bowl, combine the chocolate wafer crumbs, 3 tablespoons of the sugar, and the butter and mix well. Press onto the bottom of springform pan and set aside.

In a large mixing bowl with an electric mixer, combine cream cheese, remaining cup of sugar, vanilla extract, and vanilla bean seeds; beat until light and creamy. Add the flour to the cream cheese mixture and beat until smooth.

Add the melted chocolate and sour cream and mix well. Add the eggs, one at a time, mixing on low speed after each addition until just blended. Pour the batter into prepared pan and bake for one hour, until the center is almost set.

Run a sharp knife around the rim of the pan and allow cake to cool on a wire rack before removing rim of pan. Refrigerate at least four hours, or overnight, before serving. Cheesecake may be made up to 2 days in advance before serving and will keep for up to one week in the refrigerator. Serve the cheesecake garnished with fresh strawberries.

17 March 2010

Another Another for Your Afternoon Tea

For St. Patrick's Day this year, I decided to make some cookies that were featured on Martha Stewart's site. My boyfriend really likes simple butter cookies, sugar cookies, and all sorts of shortbreads, so I figured I could pawn them off on him if I thought they were too boring.


However, these cookies must have met a new standard in blandness because he only ate about half of them. They were buttery and that's about it. Maybe complexity is too much to ask from butter shortbread, but I wasn't really impressed. If you want a very very basic tea cookie, though, this is pretty good.


Irish Butter Shortbread
Makes 2 dozen cookies

1 cup (2 sticks) unsalted butter, room temperature
1/2 cup plus 1 tablespoon sugar
2 1/2 cups all-purpose flour, plus more for work surface

Preheat oven to 300 degrees. Line two baking sheets with parchment paper; set aside.

In the bowl of an electric mixer fitted with the paddle attachment, cream together butter and sugar. With the mixer on low, slowly add flour. Continue mixing until dough comes together to form a ball.

Transfer dough to a lightly floured work surface; roll out dough to about 1/4-inch thickness, dusting rolling pin with flour as necessary to prevent sticking. Using a 2 1/4-inch round, fluted cutter, cut out dough. Transfer to prepared baking sheet, spacing about 1 inch apart. Gather up any scraps, gently re-roll, and repeat cutting process. Take care not to overwork dough.

Transfer baking sheet to oven and bake until shortbread just begins to turn golden, about 30 minutes. Transfer cookies to a wire rack to cool. Shortbread may be stored in an airtight container for up to 3 days.

03 February 2010

Yet Another for Your Afternoon Tea

The only real experience that I have with scones was buying a Baking cookbook at Borders when I was 17; it turned out to be British, which had me confused for quite some time. What we call biscuits, they call scones; what we call cookies, they call biscuits.

If you actually read the things that I post, then you probably know that I made some Snickerdoodle scones before and that, while they weren't terrible, they also didn't really blow me away. I have had a hard time understanding what the point of a scone is when a biscuit or cookie can do the same thing.


However, these lemon scones came about as a way for me to use excess lemons and try my hand at scones one last time. I cast my net through the interweb and found a suitable recipe for me to try. Luckily, they passed the test and were the perfect combination of buttery, tart, and crumbly. I ate them with tea, I ate them plain, and I ate them warmed up with just a smidge of butter on top. They were delicious!


Lemon Scones

Makes 8 scones

2 cups all-purpose flour
1/4 cup sugar
1 teaspoon baking powder
1 teaspoon baking soda
1/4 teaspoon salt
1/2 cup cold butter or margarine
1/2 cup sour milk
1 1/2 teaspoons grated lemon peel
Additional sugar

Preheat oven to 350 degrees. Grease a baking sheet and set aside.

In a medium bowl, combine flour, sugar, baking powder, baking soda and salt. Cut in butter until mixture resembles fine crumbs. Add milk and lemon peel, stirring just until mixed.

Turn onto a floured surface; knead gently six times. Shape into a ball. On a greased baking sheet, pat dough into a circle about 1/2 in thick and 8-1/2 in. in diameter. Using a sharp knife, cut wedges in the dough, being careful not to cut all the way through.

Sprinkle with sugar. Bake in preheated oven for 20-25 minutes or until edges are lightly browned.